TePass 之前是有自己的一套个人中心,采用MDUI制作的,后面群里大部分人觉得不好,会员直接进后台就可以了,所以在0.7.0版本去掉了个人中心,用户登录后根据权限进入后台。
但是有些人就不喜欢这样,还是想让用户有个自己的会员中心,最好跟主题搭配,那么这里写一下教程。
这里以Typecho默认的主题做例子。
一、主题文件夹里创建文件
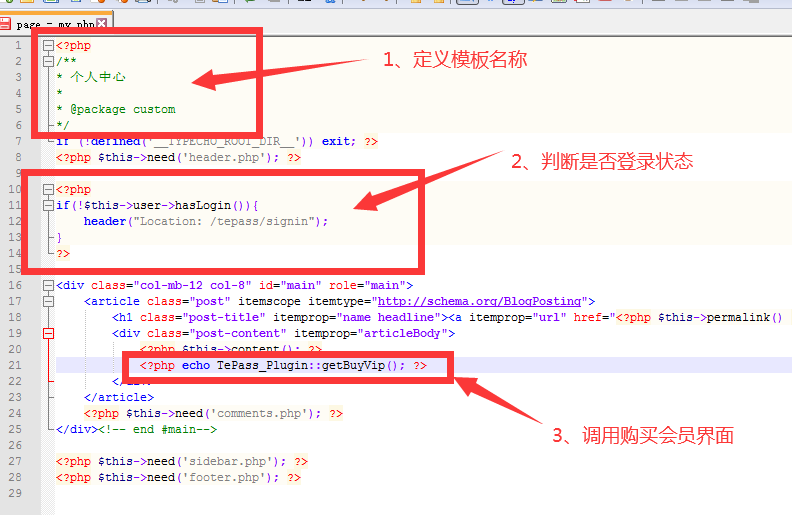
复制主题目录下的page.php文件,改名为page - my.php,然后打开新建的这个文件,修改下面的几个地方。
1、头部加模板名称;
2、判断用户是否登录,没登录跳转去登录;
<?php
if(!$this->user->hasLogin()){
    header("Location: /tepass/signin");
}
?>
3、加入购买会员的调用代码(TePass0.7.5之后版本支持)。
<?php echo TePass_Plugin::getBuyVip(); ?>
二、修改个人账号部分代码
<!-- form -->
<?php Typecho_Widget::widget('Widget_Security')->to($security); ?>
<form action="<?php $security->index('/action/users-profile'); ?>" method="post" class="input-form form" name=forma enctype="application/x-www-form-urlencoded">
<h2 class="form__title">用户中心</h2>
<table cellpadding="5" cellspacing="0" border="0" width="100%">
    <tbody>
        <tr>
        <td width="120" align="right">用户ID:</td>
        <td width="auto" align="left"><input name="username"  type="text" class="s1" value="<?php echo $this->user->uid; ?>" readonly  unselectable="on"></td>
        </tr>
        <tr>
        <td width="120" align="right">帐号:</td>
        <td width="auto" align="left"><input name="title"  type="text" class="s1" value="<?php echo $this->user->name; ?>" readonly  unselectable="on"> </td>
        </tr>
        <tr>
        <td width="120" align="right">昵称:</td>
        <td width="auto" align="left"><input name="screenName"  type="text" class="s1" value="<?php echo $this->user->screenName; ?>" <?php if($GLOBALS['lock']==1): ?> readonly  unselectable="on"<?php endif; ?>></td>
        </tr>
        <tr>
        <td width="120" align="right">联系:</td>
        <td width="auto" align="left"><input name="mail" type="text" class="s1" value="<?php echo $this->user->mail; ?>" <?php if($GLOBALS['lock']==1): ?> readonly  unselectable="on"<?php endif; ?>></td>
        </tr>
        <tr>
        <td width="120" align="right"></td>
        <td width="auto" align="left"><input name="do" type="hidden" value="profile">
            <button class="s2" type="submit" name="dosubmit"><span>确定</span></button></td>
        </tr>
    </tbody>
</table>
</form>
<!-- end form -->
三、修改密码部分代码
<!-- form -->
<form action="<?php $security->index('/action/users-profile'); ?>" method="post"  class="input-form form" enctype="application/x-www-form-urlencoded" >
<h2 class="form__title">修改密码</h2>
<?php if(!$this->user->pass('subscriber', true)){
    echo "提示:权限不足,无法修改个人账户密码!";
}?>
<table cellpadding="5" cellspacing="0" border="0" width="100%">
    <tbody>
        <tr>
        <td width="120" align="right">密码:</td>
        <td width="auto" align="left"><input type="text" name="password" class="s1" ></td>
        </tr>
        <tr>
        <td width="120" align="right">重复密码:</td>
        <td width="auto" align="left"><input class="s1" type="text" name="confirm"></td>
        </tr>
        <tr>
        <td width="120" align="right"></td>
        <td width="auto" align="left"><input name="do" type="hidden" value="password">
            <button class="s2" type="submit" name="dosubmit" ><span>确定</span></button></td>
        </tr>
    </tbody>
</table>
</form>
<!-- end form -->
四、管理后台创建独立页面
在独立页面新建一个页面,标题为个人中心,地址为my,右侧选择模板为刚才创建的个人中心,提交后,适配你主题的个人中心就制作好了。
本文属原创,转载请注明原文:https://pangsuan.com/p/tepass-design-my-page.html
评论 (0)